지난 글에서는 네이버 기사의 제목을 크롤링하는 방법에 대해 정리했었다.
이번에는 제목과 더불어 신문 기사의 url과 신문사 이름을 크롤링해보려한다.
일단 지난 시간까지 했던 코드를 다시 살펴보자.
지난 글
↓
파이썬 크롤링(웹스크래핑) - 네이버 기사 제목 웹스크래핑
from bs4 import BeautifulSoup
from selenium import webdriver

driver = webdriver.Chrome('chromedriver')

url = "https://search.naver.com/search.naver?where=news&sm=tab_jum&query=주식"

driver.get(url)
req = driver.page_source
soup = BeautifulSoup(req, 'html.parser')

articles = soup.select('#main_pack > div.news.mynews.section._prs_nws > ul > li')

for article in articles:
    a_tag = article.select_one('dl > dt > a')

    title = a_tag.text
    print(title)

driver.quit()
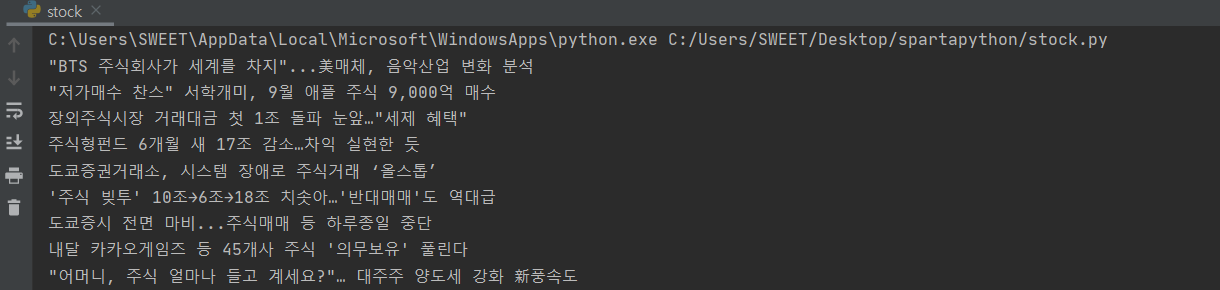
파이참에서 돌렸을 때 아래 사진처럼 결과가 잘 나온다!!
이제 기사의 url과 신문사 이름을 크롤링해보자!
1. 기사의 url를 크롤링해보자.
기사의 제목을 크로링했다면 기사의 url을 가져오는 것은 쉽다!
기사의 url은 a태그의 href이기 때문에
url = article.select_one('dl > dt > a')["href"]
이렇게 변수로 만들어주면 된다~!
좀 더 심플하게 적자면 아래 코드 처럼 된다!!!
title은 기사 제목 url은 기사의 url이다.
articles = soup.select('#main_pack > div.news.mynews.section._prs_nws > ul > li')

for article in articles:
    a_tag = article.select_one('dl > dt > a')

    title = a_tag.text
    url = a_tag['href']
    print(title, url)
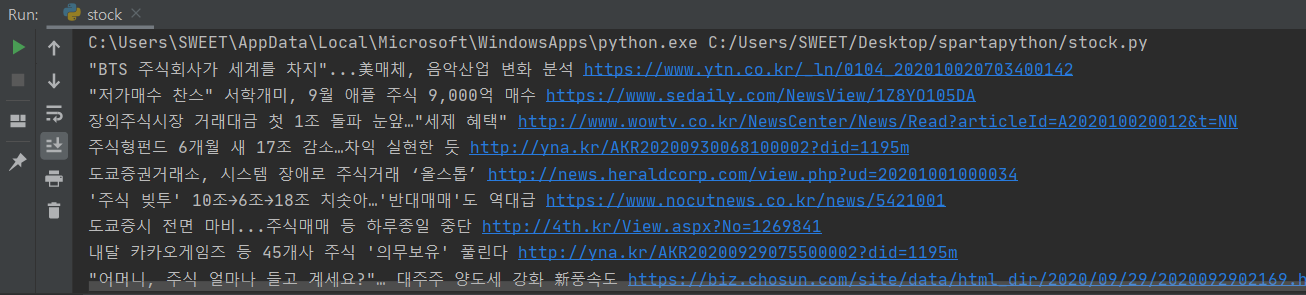
파이참에서 돌렸을 때 결과도 잘 나온다.
2. 신문사의 이름을 크롤링해보자.
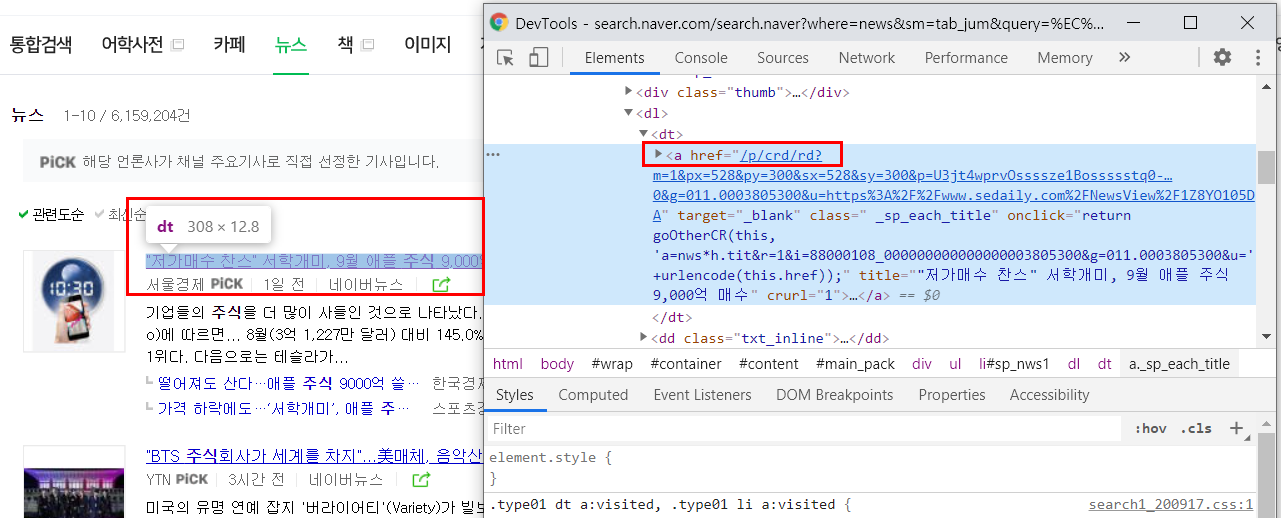
1) 일단 기사 신문사 이름에 마우스를 놓고 우클릭 한 뒤 해당 부분의 셀렉터를 카피해본다.

2) 카피를 했더니 이렇게 나온다. 여기서 가장 하단에 있는 span._sp_each_source 이부분만 가져오는 걸 먼저 시도해보자.
#sp_nws1 > dl > dd.txt_inline > span._sp_each_source
articles = soup.select('#main_pack > div.news.mynews.section._prs_nws > ul > li')

for article in articles:
    a_tag = article.select_one('dl > dt > a')

    title = a_tag.text
    url = a_tag['href']
    comp = article.select_one('span._sp_each_source')
    print(title, url, comp)
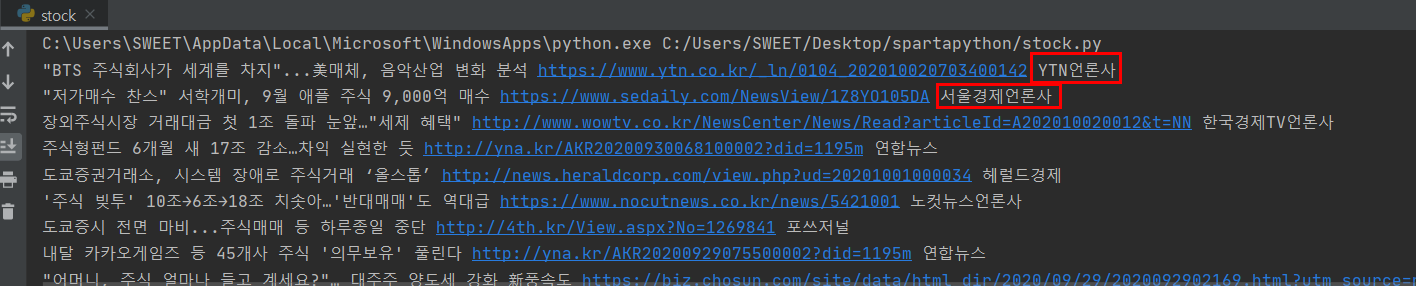
파이참으로 결과를 확인해보았다. 잘 나온다! 이제 여기서 text만 가져오면 된다.

3) .text로 텍스트만 가져온 뒤 파이참에서 다시 확인해보자.
articles = soup.select('#main_pack > div.news.mynews.section._prs_nws > ul > li')

for article in articles:
    a_tag = article.select_one('dl > dt > a')

    title = a_tag.text
    url = a_tag['href']
    comp = article.select_one('span._sp_each_source').text
    print(title, url, comp)
이제 여기서 신문사 이름 뒤 띄어쓰기 다음에 있는 '선정' 이라는 글들은 필요가 없다.
4) 그럼 split을 이용해서 띄어쓰기로 쪼갠 후 0번 인덱스만 가져오도록 코딩해준다.
그리고 replace를 이용해 언론사라는 단어는 '' 아무것도 없는 것으로 대체해준다.
articles = soup.select('#main_pack > div.news.mynews.section._prs_nws > ul > li')

for article in articles:
    a_tag = article.select_one('dl > dt > a')

    title = a_tag.text
    url = a_tag['href']
    comp = article.select_one('span._sp_each_source').text.split(' ')[0].replace('언론사','')
    print(title, url, comp)
파이참으로 확인해보자!
(파이참으로 확인할 때는 replace를 안써서 언론사는 그대로 나왔다.ㅠㅠ)
예~!!! 잘 나온다.
3. ※기사의 url과 신문사 이름을 크롤링하는 전체 코드를 확인해보자. ※
from bs4 import BeautifulSoup
from selenium import webdriver

driver = webdriver.Chrome('chromedriver')

url = "https://search.naver.com/search.naver?where=news&sm=tab_jum&query=추석"

driver.get(url)
req = driver.page_source
soup = BeautifulSoup(req, 'html.parser')

articles = soup.select('#main_pack > div.news.mynews.section._prs_nws > ul > li')

for article in articles:
    a_tag = article.select_one('dl > dt > a')

    title = a_tag.text
    url = a_tag['href']
    comp = article.select_one('span._sp_each_source').text.slpit(' ')[0]
    print(title, url, comp)

driver.quit()
4. 기사의 썸네일도 크롤링해보자!
전체 코드를 다 적진 않았고 article 변수 설정한 것과 for in 반복문 안에 있는 것들을 적었다.
여기서 thumbnail이 기사의 썸네일이다!!! 제일 어렵고 중요한 것이 바로 셀렉터 ㅠㅠ!!
이 썸네일도 ul > li > div > a > img 에 있으며 속성 값은 src 이다.
articles = soup.select("#main_pack > div.news.mynews.section._prs_nws > ul > li")
for article in articles:
    a_tag = article.select_one('dl > dt > a')

    title = a_tag.text
    url = a_tag['href']
    comp = article.select_one('span._sp_each_source').text.split(' ')[0].replace('언론사','')
    thumbnail = article.select_one('div > a > img')['src']
    print(title, url, comp, thumbnail)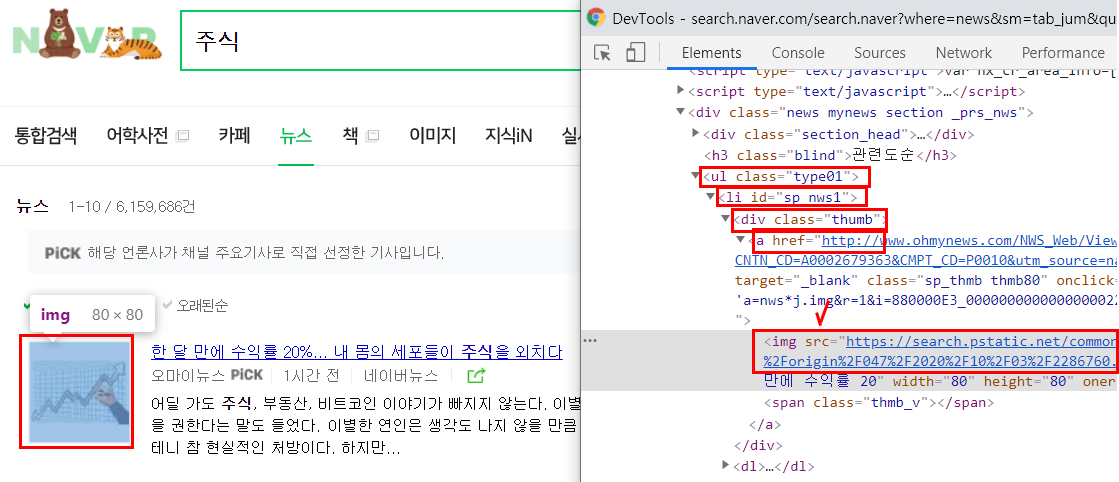

5. 기사 썸네일을 dload패키지를 사용하여 내 컴퓨터에 저장하기!
전체 코드 살펴보기 이미지 크롤링할 때처럼 dload를 import해주고변수 i를 만들어서 dload.save(thumbnail, f'news_img/{i}/jpg') 를 써주었다. 그리고 i += 1 을써서 i값을 1씩 증가시켰다.이렇게 하면 news_img라는 폴더에 썸네일 사진이 모두 저장된다~!
import dload
from bs4 import BeautifulSoup
from selenium import webdriver

driver = webdriver.Chrome('chromedriver')

url = "https://search.naver.com/search.naver?where=news&sm=tab_jum&query=주식"

driver.get(url)

req = driver.page_source
soup = BeautifulSoup(req, 'html.parser')

articles = soup.select("#main_pack > div.news.mynews.section._prs_nws > ul > li")
i = 1
for article in articles:
    a_tag = article.select_one('dl > dt > a')

    title = a_tag.text
    url = a_tag['href']
    comp = article.select_one('span._sp_each_source').text.split(' ')[0].replace('언론사','')
    thumbnail = article.select_one('div > a > img')['src']
    dload.save(thumbnail, f'news_img/{i}.jpg')
    i += 1
    print(title, url, comp, thumbnail)

driver.quit()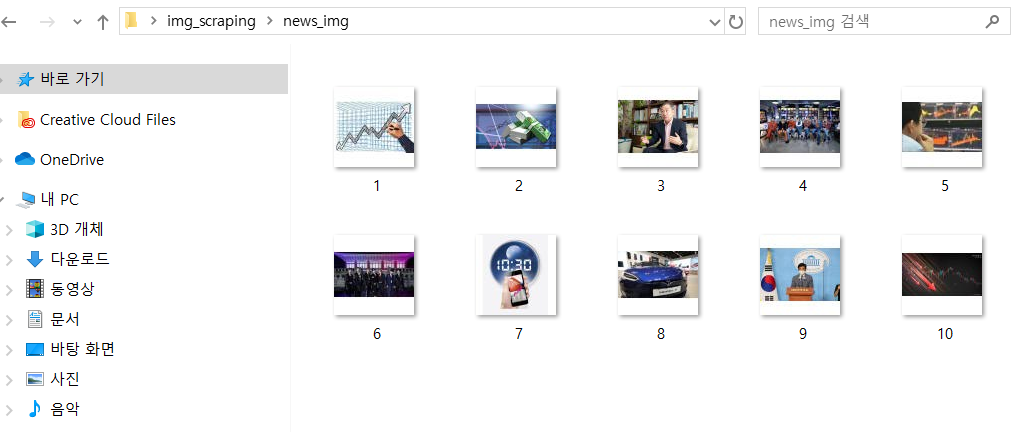
기사 웹스크래핑은 이제 끝!!!
다음 글에서는 스크래핑한 정보들을 엑셀 파일로 저장하는 것을 정리해보려한다.
↓
파이썬 크롤링(웹스크래핑) 네이버 기사 크롤링해서 엑셀에 저장